Crispy Oven-Baked Parmesan Zucchini Chips – Healthy Snack
Table of Contents
Looking for a guilt-free way to satisfy those afternoon snack cravings? Say goodbye to store-bought potato chips and hello to homemade Parmesan zucchini chips that deliver a satisfying crunch without the deep fryer. These golden-brown gems combine the natural goodness of garden-fresh zucchini with the savory depth of Parmesan cheese, creating an irresistible snack that disappears almost as quickly as you can make it.
Perfect for movie nights, after-school snacking, or elegant appetizers at your next dinner party, these oven-baked zucchini chips prove that “healthy” and “delicious” aren’t mutually exclusive terms. The best part? You likely have most ingredients already sitting in your pantry. Let’s transform humble zucchini into a crave-worthy treat that even vegetable skeptics won’t be able to resist.
Why You’ll Fall in Love With This Recipe
Unlike conventional fried chips that leave you feeling weighed down, these baked zucchini chips offer a lighter alternative without sacrificing flavor or that all-important crunch factor. Zucchini itself is impressively nutritious—low in calories yet high in vitamins A and C, potassium, and fiber. When you opt for baking over frying, you dramatically reduce the calorie count while preserving those valuable nutrients.
But let’s be honest—we’re here for the taste, and these chips deliver in spades. The marriage of nutty, umami-rich Parmesan with the subtle sweetness of zucchini creates a flavor profile that’s simultaneously sophisticated and comforting. As they bake, the cheese forms a golden crust that crackles between your teeth, while the zucchini inside maintains just enough tenderness to create a perfect textural contrast.
What truly makes these chips stand out is their incredible versatility. Serve them as an impressive yet easy appetizer alongside a glass of crisp white wine. Pack them in lunchboxes for a wholesome alternative to processed snacks. Set them out during game day alongside traditional favorites, or serve them as a side dish that complements nearly any main course. The possibilities are as endless as your appetite for these addictive little rounds.
The Perfect Ingredients Make Perfect Chips
Zucchini
The foundation of our recipe starts with selecting the right zucchini. Look for medium-sized specimens—roughly 7-8 inches long and 2 inches in diameter. These provide the ideal balance of flesh to skin ratio and contain less seeds than their larger counterparts. Freshness matters tremendously; choose zucchini that feel heavy for their size with shiny, unblemished skin that’s vibrant green. The fresher your zucchini, the less water content you’ll need to combat during baking.
Parmesan Cheese
While pre-grated Parmesan from a container may seem convenient, freshly grated Parmesan makes a world of difference in both texture and flavor. Authentic Parmigiano-Reggiano offers complex nutty notes and superior melting properties that transform ordinary zucchini into something extraordinary. Grate it yourself just before using for maximum flavor—the small effort yields significant rewards. For those with dairy restrictions, nutritional yeast can provide a similar umami quality without the cheese.
Breadcrumbs
The choice of breadcrumbs dramatically affects your final result. Panko breadcrumbs create the crispiest exterior with their larger, airier structure that browns beautifully. Traditional breadcrumbs work well too, offering a finer coating that adheres exceptionally well to the zucchini surface. For a gluten-free option, almond flour or crushed pork rinds provide excellent alternatives that still achieve that coveted crunch factor. Whichever you choose, combining breadcrumbs with Parmesan creates the perfect crust that seals in moisture while developing a satisfying crispness.
Seasonings
While zucchini and Parmesan create a delicious foundation, the right seasonings elevate these chips to crave-worthy status. Garlic powder (not garlic salt) provides aromatic depth without overwhelming the delicate zucchini flavor. A half teaspoon of dried Italian herbs—basil, oregano, and thyme—adds Mediterranean flair that complements the Parmesan perfectly. Freshly ground black pepper and a judicious pinch of salt (remember, Parmesan already contributes saltiness) round out the flavor profile. For heat lovers, a dash of cayenne or red pepper flakes adds welcome complexity.
Binding Agents
To help your carefully crafted coating adhere to the zucchini slices, you’ll need a binding agent. Lightly beaten egg whites work wonderfully, creating a protein-rich layer that promotes browning without adding fat. For a vegan alternative, olive oil serves the same purpose while adding a fruity note that pairs beautifully with the other Mediterranean flavors. Either option ensures your coating stays put, transforming from a dusty layer into a cohesive, crunchy crust during baking.
From Garden to Table: A Step-by-Step Guide
1. Prepping the Perfect Zucchini Slices
Begin by thoroughly washing your zucchini under cool running water, scrubbing gently with a vegetable brush to remove any lingering soil. Pat dry with paper towels before trimming off both ends. For chips that cook evenly and achieve maximum crispness, consistency is key—aim for slices approximately 1/8-inch thick. A mandoline slicer provides the most uniform results, though a steady hand and sharp chef’s knife work nearly as well.
Once sliced, place your zucchini rounds in a single layer on paper towels, then sprinkle lightly with kosher salt. This crucial step draws out excess moisture that could otherwise prevent proper crisping. Let them sit for 15-20 minutes, then blot thoroughly with additional paper towels, pressing gently to remove as much liquid as possible. This moisture-removal technique makes the difference between soggy discs and crackling chips.
2. Creating the Perfect Parmesan Coating
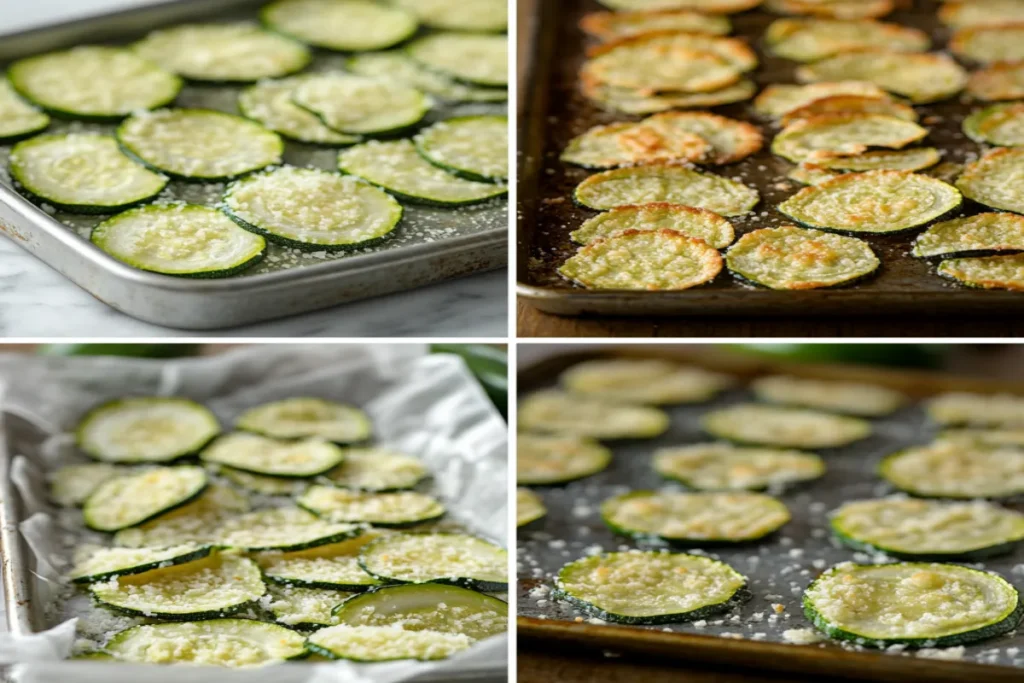
While your zucchini slices shed their excess moisture, prepare your coating. In a medium bowl, combine 1 cup freshly grated Parmesan cheese, 1 cup of your chosen breadcrumbs, 1 teaspoon garlic powder, 1/2 teaspoon dried Italian herbs, 1/4 teaspoon freshly ground black pepper, and a pinch of salt. Whisk thoroughly to ensure even distribution of all ingredients—this prevents flavor pockets and ensures each chip enjoys the full benefit of your seasoning blend.
3. The Dipping Process
Now comes the assembly line portion of our recipe. In a shallow bowl, lightly beat two egg whites until just frothy (or pour 3 tablespoons of olive oil into a similar dish). Working with a few slices at a time to prevent crowding, dip each zucchini round first into your binding agent, allowing any excess to drip off. Then press each slice into the Parmesan mixture, turning to coat both sides and patting gently to ensure the coating adheres well. For an extra-thick coating, you can double-dip—just return the coated slice to the egg white and then back into the Parmesan mixture.
4. Arranging for Optimal Baking
Preheat your oven to 425°F (220°C) and line two large baking sheets with parchment paper or silicone baking mats. Arrange your coated zucchini slices in a single layer, ensuring they don’t touch or overlap—crowding prevents proper air circulation and results in steaming rather than crisping. For truly exceptional results, place a wire cooling rack on top of your baking sheet and arrange the zucchini on this elevated surface; the increased airflow beneath the chips promotes even browning on both sides.
5. The Baking Magic
Slide your carefully arranged trays into the preheated oven. Bake for 20-25 minutes total, rotating the trays halfway through cooking time to ensure even browning. During the final 5 minutes, watch carefully as the difference between perfectly golden and overly browned happens quickly. You’re looking for a rich golden hue and a firm texture that signifies proper dehydration and crisping. Some chips along the edges may finish more quickly; don’t hesitate to remove these individually while allowing less-done chips more time.
Upon removal from the oven, allow the chips to cool directly on the baking sheet for 5 minutes—they’ll continue crisping during this time as residual heat evaporates the last traces of moisture. Transfer to a wire rack for complete cooling if not serving immediately; this prevents condensation from softening your perfectly crisp creation.
Secrets to Chip Perfection
The difference between good zucchini chips and great ones often comes down to technique. Uniformity in slicing cannot be overstated—variations as small as 1/16 inch can result in some chips burning while others remain underdone. If you don’t own a mandoline, create a slicing guide by placing chopsticks on either side of your zucchini to prevent your knife from cutting too deeply.
Moisture management remains the biggest challenge when creating crispy zucchini chips. Beyond the initial salting, consider placing paper towels between your baking sheet and parchment paper to absorb any moisture released during baking. For especially humid days, you might need to extend baking time by 3-5 minutes at a slightly lower temperature (400°F) to achieve the desired crispness without burning.
Pay attention to your oven’s particular behavior—most home ovens have hot spots that can affect even cooking. Rotating not just the trays but also the orientation of the trays can help compensate for these variations. If your oven has a convection setting, use it—the circulating air promotes even browning and faster moisture evaporation.
Finally, resist the urge to stack your finished chips while still warm. Even a minute of overlapping can trap steam and undo your careful work toward crispness. Patience during cooling yields the audible crunch that makes these chips so satisfying.
Making It Your Own: Creative Variations
Once you’ve mastered the basic recipe, the world of flavor variations opens before you. For a Mediterranean twist, swap traditional Parmesan for aged Pecorino Romano, which introduces a sharper, saltier profile, and add a teaspoon of finely minced fresh rosemary to the coating. Feeling adventurous? A half teaspoon of smoked paprika transforms the flavor profile entirely, lending a subtle smokiness that mimics the char of grilled vegetables.
Spice enthusiasts can kick up the heat by incorporating a quarter teaspoon of cayenne pepper or red pepper flakes into the coating mixture. For an Asian-inspired variation, replace the Italian herbs with a half teaspoon of five-spice powder and add a tablespoon of white sesame seeds to the breadcrumb mixture for visual interest and nutty flavor.
The dipping possibilities extend your customization options even further. Serve alongside a cooling tzatziki sauce for a Greek-inspired appetizer, or pair with zesty marinara for an Italian approach. Garlic aioli provides a rich counterpoint to the light chips, while a simple squeeze of fresh lemon just before serving brightens the entire experience.
For those following specific dietary protocols, these chips adapt beautifully. Keto enthusiasts can eliminate breadcrumbs entirely, relying instead on a mixture of Parmesan and almond flour. Vegans might replace the Parmesan with nutritional yeast and ground cashews for a surprisingly cheese-like experience.
Serving and Storage Wisdom
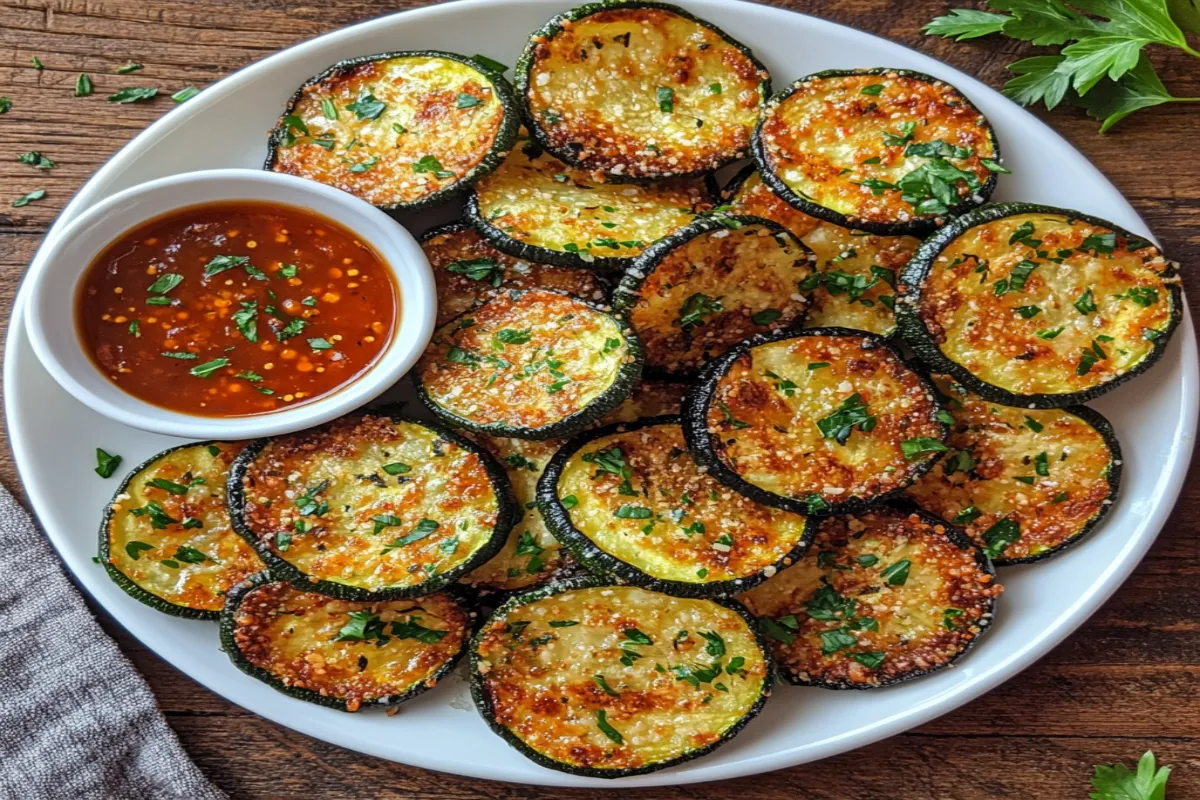
These zucchini chips showcase their best texture when served immediately, while the contrast between crisp exterior and tender interior remains perfect. Arrange them on a serving platter with small bowls of complementary dipping sauces, garnishing with a sprinkle of fresh herbs or an additional dusting of finely grated Parmesan for visual appeal.
If you must make them ahead, store completely cooled chips in a paper bag—never plastic, which traps moisture and accelerates softening. When ready to serve, refresh them with a quick 3-5 minute stint in a 350°F oven, arranged in a single layer on a baking sheet. This restores much of their original texture without further browning.
For meal prep convenience, you can complete all steps up through coating the zucchini slices, then refrigerate the unbaked chips for up to 8 hours on a parchment-lined tray covered loosely with plastic wrap. When ready to serve, simply bake as directed, adding an extra 2-3 minutes to compensate for the chilled starting temperature.
Answers to Your Burning Questions
Can I make these chips without breadcrumbs? Absolutely! For a gluten-free or lower-carb version, replace breadcrumbs with almond flour, crushed pork rinds, or simply increase the Parmesan while adding 2 tablespoons of nutritional yeast for extra binding power. The texture will differ slightly but remains deliciously crisp.
How do I prevent the chips from becoming soggy? Thorough moisture removal before baking is essential. Beyond salting and blotting, ensure your oven is fully preheated before inserting the trays, use a wire rack if possible, and allow ample space between chips. For persistently humid environments, reducing your oven temperature to 375°F and extending baking time helps drive off moisture without burning.
Can I use a different type of cheese? While Parmesan’s low moisture content makes it ideal, other hard cheeses like Asiago, aged Gouda, or Manchego work beautifully. Avoid softer cheeses like cheddar or mozzarella as standalone options, as they melt differently and can cause spreading. If you love these flavors, use them as a supplementary cheese—75% Parmesan with 25% sharp cheddar creates an interesting flavor dimension while maintaining structural integrity.
Are these chips suitable for a keto diet? With minor modifications, absolutely! Eliminate breadcrumbs completely, relying instead on a mixture of grated Parmesan, almond flour, and crushed pork rinds. These substitutions maintain the crispy texture while dramatically reducing carbohydrate content, making them perfect for ketogenic eating plans.
Crispy Conclusion
There’s something undeniably satisfying about transforming humble zucchini into these golden, crunchy coins of goodness. Beyond their impressive nutritional profile, these Parmesan zucchini chips deliver the textural excitement and flavor satisfaction we all crave in a snack—without the post-snacking guilt that often accompanies conventional chips.
Whether you’re a seasoned chef looking to expand your appetizer repertoire or a home cook searching for healthier alternatives to family favorites, these oven-baked treats deserve a place in your culinary rotation. The techniques you’ve learned here—careful moisture management, proper seasoning, and temperature control—transfer beautifully to other vegetable chips, opening a world of crispy possibilities.
We’d love to hear about your zucchini chip adventures! Did you try one of our suggested variations or create your own signature flavor? Share your results in the comments below, or tag us in your social media posts. And don’t forget to subscribe to our newsletter for more wholesome, crave-worthy recipes that prove healthy eating never means sacrificing flavor or enjoyment.
Happy baking!