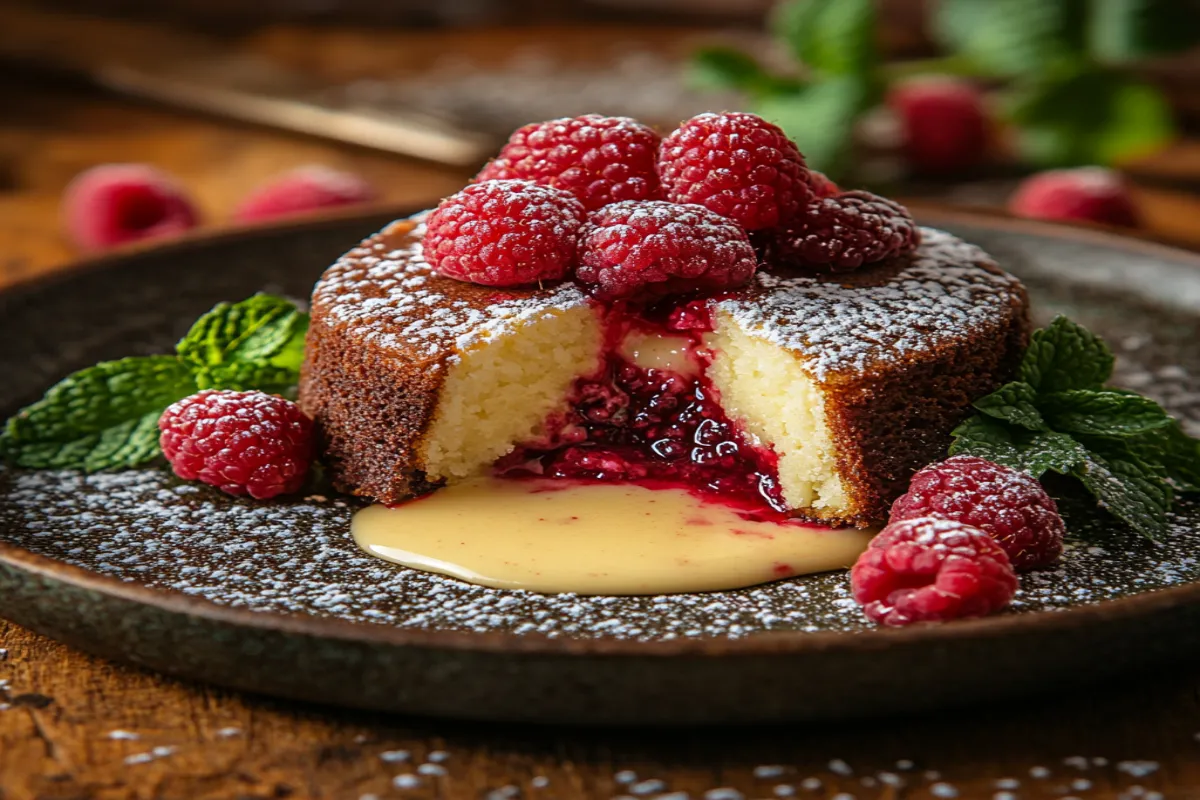
White Chocolate Raspberry Lava Cake – The Best Dessert
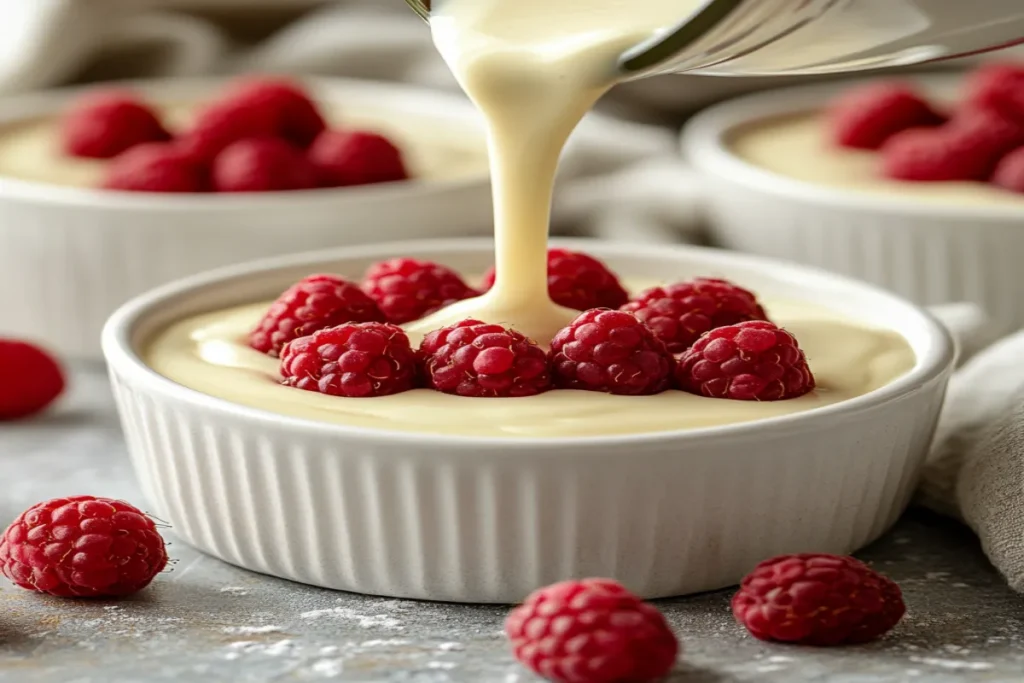
There’s something magical about cracking into a warm, delicate cake and watching velvety chocolate ooze out like a sweet, molten river. Now imagine that sensation elevated—with the creamy richness of white chocolate and the vibrant tang of fresh raspberries. That’s the irresistible charm of the White Chocolate Raspberry Lava Cake.
Whether you’re planning a romantic dinner, hosting a party, or just treating yourself on a cozy night in, this dessert delivers sophistication and indulgence in every spoonful. You’ll discover how simple it is to bake this restaurant-quality delight in your own kitchen. Don’t miss our gourmet dessert collection for more ideas like this White Chocolate Raspberry Lava Cake.
Table of Contents
What Is a White Chocolate Raspberry Lava Cake?
Understanding the Lava Cake Phenomenon
The lava cake, also known as molten chocolate cake or fondant cake, first rose to fame in the early 1980s. Its defining trait is a soft cake exterior that hides a gooey, flowing center. Traditionally made with dark chocolate, the lava cake has since evolved to include creative twists—like this white chocolate raspberry version—that cater to a variety of palates.
Unlike the more common dark chocolate base, white chocolate delivers a milder, buttery sweetness. Combined with juicy raspberries, it creates a balance between creamy and tangy that’s unlike anything else.
What Makes This Version Unique: White Chocolate + Raspberries
This dessert isn’t just a variation—it’s a flavor revelation. White chocolate raspberry lava cake blends two distinct elements:
- White Chocolate: Known for its smooth, cocoa-butter base, white chocolate melts into a luxurious center with a rich mouthfeel.
- Raspberries: Their natural tartness cuts through the sweetness, adding bursts of fruity flavor and vibrant color throughout the dessert.
When baked just right, you’ll get a tender sponge-like cake with a molten white chocolate core and pockets of warm raspberries in every bite.
A Modern Twist on a Classic French Dessert
Inspired by the French fondant au chocolat, this version adds a fresh American spin with fruit-forward ingredients. While lava cakes are often reserved for upscale dining, more home bakers are discovering how achievable they really are with just a few ingredients and a little finesse.
The white chocolate raspberry lava cake is not only Instagram-worthy but also perfect for anniversaries, Valentine’s Day, or anytime you want to impress without spending hours in the kitchen.
Key Ingredients and Tools You’ll Need
Creating the perfect white chocolate raspberry lava cake starts with quality ingredients and reliable kitchen tools. This section lays out everything you’ll need, including tips to avoid common pitfalls when working with white chocolate and berries.
Why White Chocolate Is Tricky Yet Rewarding
White chocolate can be more temperamental than dark or milk chocolate. It contains cocoa butter but lacks cocoa solids, which means:
- It burns faster if overheated.
- It’s sweeter, so balance is crucial.
- It may seize up when melted improperly, especially if water or steam gets in.
Choose high-quality white chocolate with real cocoa butter—look for bars, not chips, as chips often contain stabilizers that prevent smooth melting.
Recommended brands for baking include:
| Brand | Cocoa Butter % | Notes |
|---|---|---|
| Valrhona Ivoire | 35% | Ultra-smooth texture, gourmet quality |
| Ghirardelli | 33% | Widely available, melts evenly |
| Callebaut | 28% | Good for both baking and ganache |
Pro Tip: Chop white chocolate finely to ensure it melts evenly when heated over a double boiler or in the microwave.
Fresh vs Frozen Raspberries in Baking
Raspberries add more than just color—they offer moisture, acidity, and a delightful burst of flavor that complements the creamy core. But which form should you use?
| Type | Pros | Cons |
|---|---|---|
| Fresh | Brighter taste and texture | Can break down quickly in batter |
| Frozen | Convenient and affordable | May release extra water when baked |
If using frozen raspberries, do not thaw them before folding into the batter—this helps prevent bleeding and sogginess. Alternatively, use a raspberry compote center for more control.
Must-Have Kitchen Tools for Perfect Lava Cakes
To get that gooey white chocolate center and a perfect shape, the right tools matter:
- Ramekins or Muffin Tins – Use 6 oz ceramic ramekins for best results; metal tins work but bake faster.
- Mixing Bowls – Heatproof glass or metal bowls are ideal for melting chocolate.
- Double Boiler or Microwave – Gently melts white chocolate to prevent burning.
- Rubber Spatula – Helps fold ingredients without deflating the batter.
- Whisk – Ensures eggs and sugar are fully combined and fluffy.
Optional:
- Kitchen scale for accurate measurements
- Sifter for even flour distribution
- Cooling rack to prevent overcooking after baking
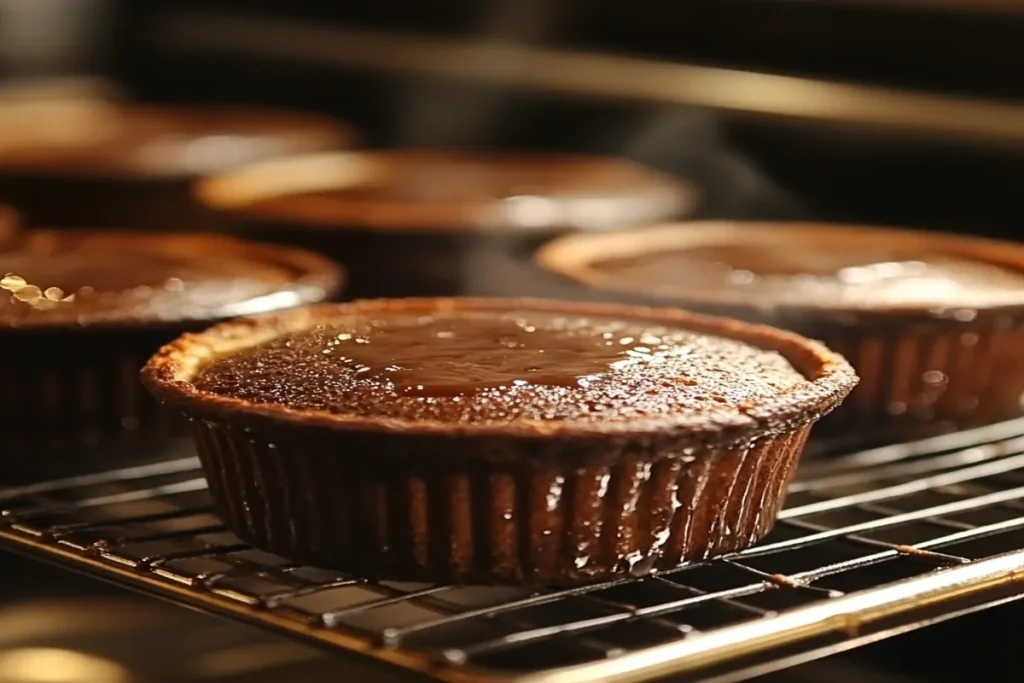
Step-by-Step Recipe for White Chocolate Raspberry Lava Cake
Baking a white chocolate raspberry lava cake might look fancy, but it’s surprisingly simple when broken down into clear steps. From melting the chocolate to folding in raspberries, every move matters. Follow this no-fail recipe for gooey centers and golden edges every time.
Melting and Tempering White Chocolate Correctly
The key to the perfect molten white chocolate center is gentle melting and tempering. Rushing this process can cause clumping or burning.
Method A: Double Boiler (Recommended)
- Fill a pot with 1–2 inches of water and bring it to a simmer.
- Place a heatproof bowl over the pot (ensure the bottom doesn’t touch the water).
- Add chopped white chocolate and unsalted butter.
- Stir frequently until smooth and glossy.
Method B: Microwave
- Combine butter and white chocolate in a microwave-safe bowl.
- Heat in 20-second intervals, stirring between each burst.
- Stop as soon as the mixture is melted and lump-free.
Tip: Add a pinch of salt or a dash of vanilla extract here to elevate the white chocolate’s flavor.
Folding Raspberries Without Breaking the Cake Structure
Now comes the tricky part—incorporating your raspberries without turning your batter pink or soupy.
- Let the chocolate mixture cool slightly.
- In a separate bowl, whisk eggs and sugar until pale and thick (about 2 minutes).
- Gently fold the egg mixture into the cooled chocolate using a spatula.
- Sift in flour and stir until combined.
- Carefully fold in whole raspberries—fresh or frozen—avoiding overmixing.
If you want a lava-like raspberry burst inside, press a spoonful of raspberry preserves into the center before baking.
Timing the Bake: How to Achieve a Gooey Center
Now that your batter is ready, here’s how to nail the lava effect:
- Preheat oven to 425°F (220°C).
- Grease your ramekins with butter and lightly dust with flour or sugar.
- Divide the batter evenly between 4–6 ramekins.
- Bake for 11–13 minutes, until edges are set but centers jiggle slightly when shaken.
- Let cakes sit for 1 minute, then run a knife around the edges and invert onto serving plates.
Do not overbake! The goal is a just-set exterior and flowing white chocolate inside.
Sample Baking Time Table:
| Oven Type | Temperature | Baking Time |
|---|---|---|
| Conventional | 425°F | 12 minutes |
| Convection | 400°F | 10 minutes |
| Air Fryer (with ramekins) | 390°F | 8–9 minutes |
Tips to Avoid Common Mistakes
Even the best dessert intentions can go sideways if you’re not careful. When it comes to baking a delicate dessert like white chocolate raspberry lava cake, small missteps can lead to overcooked centers, collapsed cakes, or gritty textures. Here’s how to avoid the most common blunders.
Preventing Overbaking and Dry Centers
Overbaking is the number one reason your lava cake might end up more like a muffin.
- Know your oven – Oven temperatures can vary, so use an oven thermometer to confirm accuracy.
- Watch the edges, not the top – The top may still look soft, but if the edges are firm, your cake is ready.
- Do a jiggle test – A slight jiggle in the center is a good sign. If it jiggles too much, bake for 30 more seconds.
If you’re baking multiple ramekins, rotate the tray halfway through for even results.
Avoiding Curdled Chocolate or Lumpy Batter
Melted white chocolate is delicate and needs patience. Rushing or overheating can lead to separation or curdling.
- Always melt over low, indirect heat, especially with white chocolate.
- Let the chocolate mixture cool slightly before adding eggs—if it’s too hot, it’ll scramble them.
- Don’t overmix – Vigorous stirring can deflate the batter and make the cake dense instead of airy.
Ensuring the Raspberries Don’t Sink or Burn
Raspberries are juicy, soft, and prone to sinking if your batter is too thin or the berries are too wet.
- Pat fresh raspberries dry with a paper towel before folding them in.
- Toss frozen raspberries in a little flour to keep them suspended in the batter.
- Add jam or preserves in the center instead of mixing in whole berries to avoid sinking.
Want a perfectly centered lava effect? Freeze a dollop of raspberry jam and press it into the middle of the batter before baking.
Creative Variations and Flavor Twists
Once you’ve mastered the basic white chocolate raspberry lava cake, the sky’s the limit. Whether you’re baking for picky kids, health-conscious eaters, or a fancy dinner party, these creative flavor spins will make your dessert stand out—and might even make it unforgettable.
Adding Almond or Vanilla Extract for Depth
Subtle enhancements can dramatically elevate your cake’s flavor profile without complicating the recipe.
- Almond Extract – Just 1/4 tsp adds a nutty, marzipan-like undertone that pairs beautifully with raspberries.
- Pure Vanilla Extract – A teaspoon deepens the richness of the white chocolate and rounds out sweetness.
Pro tip: For a gourmet twist, try using vanilla bean paste for specks of real vanilla in every bite.
Raspberry Sauce Swirl or Filling
Instead of folding raspberries into the batter, try incorporating a raspberry compote or jam swirl for a dramatic visual and flavor burst.
Swirl Method:
- Spoon half the batter into the ramekin.
- Add 1 tsp of raspberry jam or compote.
- Add remaining batter and gently swirl with a toothpick.
Lava Center Method:
- Freeze teaspoons of raspberry jam in advance.
- Insert one frozen portion in the center of each cake before baking.
This technique guarantees a lava-like fruit explosion to complement the molten white chocolate center.
Lava Cake Cupcakes and Mini Bites for Parties
Need a bite-sized dessert option? The white chocolate raspberry flavor profile works brilliantly in miniature form.
- Mini Muffin Tin Version – Great for dessert tables or brunch spreads.
- Lava Cupcakes – Use cupcake liners and a jam filling for a grab-and-go molten treat.
- Heart-Shaped Silicone Molds – Perfect for Valentine’s Day or anniversaries.
Just reduce bake time to 7–9 minutes for mini versions to maintain that gooey core.
Flavor Boosters for Adventurous Bakers
Want to really impress your guests? Experiment with:
- Lemon zest in the batter for a tangy lift
- A splash of raspberry liqueur (like Chambord) in the sauce
- A pinch of cardamom for warmth and complexity
These simple add-ins can turn your raspberry lava cake into a true flavor masterpiece.
Serving and Presentation Ideas
The only thing better than the white chocolate raspberry lava cake melting in your mouth… is seeing it melt on the plate. How you serve this dessert can elevate the entire experience, turning a delicious treat into a full sensory event. Whether you’re plating for guests or styling for social media, here’s how to make your lava cake look as good as it tastes.
Best Ways to Plate the Lava Cake
Your presentation begins the moment you remove the cake from its ramekin. To ensure a flawless plate:
- Invert the cake while still warm—wait 1 minute after baking, run a knife along the edges, then flip onto a warm plate.
- Dust with powdered sugar using a fine mesh sieve for an elegant snowy finish.
- Serve on dark or matte plates to contrast with the pale white chocolate.
A perfectly plated molten white chocolate raspberry cake should show off its gooey center as soon as you cut into it—so be sure to warm the plate if needed to keep the core flowing.
Garnishes That Pop: Whipped Cream, Fresh Raspberries, and Mint
Simple garnishes can add color, texture, and contrast.
| Garnish | Purpose | Placement |
|---|---|---|
| Fresh raspberries | Enhances fruity notes | Around the cake base |
| Whipped cream or Chantilly | Light, airy contrast to the gooey center | Next to or on top |
| Fresh mint leaves | Adds aroma and visual flair | Center or side of plate |
| Powdered sugar | Finishing touch | Light dusting over top |
You can also try edible flowers for a garden-fresh spring look, or even drizzle with a raspberry reduction to amplify the berry component.
Pairing with Ice Cream, Custards, or Coffee
For the full experience, pair your white chocolate lava dessert with something cold or creamy to contrast the warm, molten center.
- Vanilla bean or raspberry ripple ice cream – A classic combo
- Lemon custard or crème anglaise – Adds tartness and elegance
- Espresso or dessert wine – Complements the richness
Tip: Serve the dessert immediately after baking so the lava center remains gooey and contrasts beautifully with cold ice cream or custard.
Storage and Reheating Tips
Can you make white chocolate raspberry lava cakes ahead of time without sacrificing that perfect molten center? Absolutely. With a few simple tricks, you can store, reheat, or even freeze your cakes while keeping them gooey and delightful. Here’s how to preserve the magic.
Storing Lava Cakes for Later Without Ruining the Center
If you’ve baked your cakes but want to enjoy them later, storage is key. The gooey center will solidify once cooled, but don’t worry—it can be revived.
- Refrigerate cooled cakes in an airtight container for up to 3 days.
- Let them cool fully before storing to avoid condensation.
- Place parchment between stacked cakes to prevent sticking.
For best results, slightly underbake if planning to reheat later—this will help maintain the molten center upon warming.
Best Reheating Methods to Retain Texture
Reheating a lava cake isn’t just about warming it up—it’s about re-melting the core without overcooking the outer layer. Here’s how:
Microwave Method:
- Place cake on a microwave-safe plate.
- Heat on medium power for 20–30 seconds.
- Check if the center is warm; don’t overheat.
Oven Method:
- Preheat oven to 350°F (175°C).
- Wrap cake in foil and bake for 8–10 minutes.
- Let sit for 1 minute before serving.
| Method | Best For | Notes |
|---|---|---|
| Microwave | Quick single servings | Watch closely to avoid drying |
| Oven | Reheating multiple cakes | Preserves crust texture better |
Freezing and Defrosting Instructions
Want to make a batch ahead for parties or surprise cravings? Freezing your white chocolate raspberry lava cakes is totally doable.
To Freeze Unbaked Lava Cakes:
- Prepare batter and pour into greased ramekins.
- Cover tightly with plastic wrap and foil.
- Freeze for up to 1 month.
- Bake from frozen at 425°F for 14–16 minutes (add 2–3 minutes to original time).
To Freeze Baked Cakes:
- Cool completely, wrap tightly, and freeze for up to 1 month.
- Reheat in oven (not microwave) for better texture.
Tip: Label with date and reheating time for convenience.
Healthier & Gluten-Free Alternatives
How to Make a Gluten-Free Lava Cake
If you’re avoiding gluten but still crave a gooey, indulgent treat, you’re in luck. Making a gluten-free white chocolate raspberry lava cake is totally doable without sacrificing flavor or texture. All you need is the right flour and a few tips to help it come out just as decadent as the traditional version.
Use Almond Flour or a Gluten-Free Blend
Almond flour is a top choice because it adds a nutty flavor that pairs beautifully with white chocolate and raspberry. You can also go with a 1-to-1 gluten-free baking flour blend—these are made to mimic all-purpose flour and usually contain xanthan gum to hold the structure.
| Flour Option | Texture Outcome | Flavor Note |
|---|---|---|
| Almond Flour | Slightly denser | Nutty and rich |
| GF 1-to-1 Blend | Very close to AP | Neutral flavor |
| Oat Flour (certified GF) | Slightly crumbly | Earthy, mild sweetness |
Check Your White Chocolate
Some white chocolates include barley malt or other gluten-containing stabilizers. Always check the label to ensure your chocolate is certified gluten-free.
Prep the Ramekins Carefully
Gluten-free batters can be a little more delicate. Grease your ramekins well and dust them with cocoa powder or gluten-free flour to prevent sticking. Skipping this step can lead to a messy unmolding experience—even more so than with regular lava cakes.
Lightened-Up Versions Using Less Sugar or Dairy-Free Swaps
Trying to make your dessert a little healthier? With a few smart ingredient swaps, you can still enjoy all the decadence without the guilt.
Natural Sweeteners Instead of Refined Sugar
You can replace regular sugar with coconut sugar, monk fruit, or maple syrup to reduce the glycemic impact.
- Coconut sugar adds a caramel-like depth
- Monk fruit sweetener works well for a sugar-free option
- Maple syrup enhances the fruity raspberry flavor
If using a liquid sweetener like maple syrup, reduce other liquids in the recipe to maintain structure.
Dairy-Free Alternatives
Want to make your lava cakes dairy-free? Easy.
- Use dairy-free white chocolate chips (made with rice or coconut milk)
- Swap butter for vegan margarine or coconut oil
- Choose almond milk or oat milk instead of heavy cream
These swaps won’t just suit vegans or lactose-intolerant guests—they’ll also give the dessert a unique spin in flavor and texture.
Control Portion Size for Health-Conscious Guests
Bake the lava cakes in mini muffin tins for bite-sized servings. This way, you get all the pleasure of a rich dessert in a smaller, more manageable portion.
Troubleshooting and Expert Tips
What to Do If Your Lava Cake Is Overbaked
There’s nothing more disappointing than cutting into a lava cake and finding… no lava. If your white chocolate raspberry lava cake comes out dry or fully set inside, don’t panic—it’s fixable, or at least still edible!
Identify the Overbake Signs
- The sides pull away from the ramekin too much
- No jiggle when you gently shake the ramekin
- Dry cracks on top (no sheen)
These signs mean the gooey center has cooked through. The good news? It still tastes amazing, especially with toppings like fresh raspberry coulis or melting vanilla ice cream.
How to Adjust Next Time
- Bake for 1–2 minutes less: Oven strength varies wildly; test one cake before baking the rest.
- Use an oven thermometer: Your oven might be running hotter than the dial says.
- Refrigerate batter before baking: A chilled batter takes longer to set, helping preserve the lava center.
Pro Tip: Bake one test cake from your batch. Once you dial in the perfect timing, bake the others with confidence.
Professional Hacks for Consistency Every Time
Getting that Instagram-worthy molten center isn’t just luck—it’s all about precision. These expert tips ensure you’ll nail it every single time.
Use a Digital Scale for Ingredients
Accuracy matters. Even small measurement errors can affect the texture of the cake. Invest in a digital kitchen scale for foolproof results.
Freeze the Filling for a Foolproof Lava Core
This trick works wonders:
- Make a small white chocolate ganache ball or just scoop some white chocolate chips
- Freeze for 30 minutes
- Insert into the center of your batter before baking
The frozen center melts slower than the batter, guaranteeing that gooey goodness right when you cut it open.
Resting Time After Baking
Let your lava cakes rest for 60–90 seconds after baking. This allows the exterior to firm up enough for unmolding without losing that luscious core.
Pro Tip: Flip it gently—don’t shake the ramekin. Just place a plate on top and invert smoothly.
Bake in Batches
Don’t overcrowd the oven. Uneven airflow can mess up your timing. For best results, bake in small batches—especially if you’re hosting or meal-prepping.
Serve Immediately
Lava cakes are meant to be eaten fresh. The gooey center sets as it cools, so plan your timing to enjoy them warm from the oven.
FAQs About White Chocolate Raspberry Lava Cake
What is the best way to store white chocolate raspberry lava cake?
For short-term storage, let the lava cakes cool completely and then place them in an airtight container in the refrigerator for up to 3 days. To reheat, microwave for 20–30 seconds until the center is warm and gooey again. Just be careful not to overheat or you’ll lose the signature molten center. You can also reheat them in the oven at 350°F for about 5–7 minutes.
Tip: Avoid stacking the cakes to prevent them from sticking or collapsing.
Can I make white chocolate raspberry lava cakes ahead of time?
Absolutely! These lava cakes are great make-ahead desserts. Prepare the batter and pour it into greased ramekins. Then, cover tightly with plastic wrap and refrigerate for up to 24 hours. When you’re ready, just pop them into a preheated oven and bake as directed. You may need to add 1–2 minutes of baking time if starting from cold.
For longer prep, you can even freeze the filled ramekins and bake them directly from frozen—just adjust your bake time accordingly.
What type of white chocolate works best in lava cakes?
Use high-quality white chocolate bars (at least 30% cocoa butter), not white chocolate chips. Chips contain stabilizers that prevent smooth melting, which is crucial for that gooey lava texture. Brands like Lindt, Ghirardelli, or Valrhona are ideal for a rich, smooth center.
If using white chocolate chips, add a touch of cream to compensate for the waxy texture.
How do I ensure the lava center stays gooey?
It’s all about timing. Bake for 11–13 minutes, or until the edges are set but the center is still jiggly. You can also freeze a ball of white chocolate ganache and insert it in the center of the batter before baking—this guarantees a molten center every time.
Pro Hack: Test-bake one ramekin first before committing to the full batch. Every oven behaves differently.
Can I use frozen raspberries in this recipe?
Yes, frozen raspberries work perfectly in white chocolate raspberry lava cakes, but there are a few tricks. Don’t thaw them first—use them straight from the freezer to prevent excess liquid from ruining the batter. You can also lightly coat the frozen berries in flour or cornstarch before folding them into the mix.
This helps keep them suspended evenly and reduces moisture release during baking.
Is there a gluten-free version of white chocolate raspberry lava cake?
Yes! Replace regular flour with a 1-to-1 gluten-free flour blend or almond flour. Also, double-check your white chocolate to ensure it’s gluten-free. These swaps won’t affect the molten center or delicious flavor, and they’re perfect for guests with gluten sensitivities.
Want even fewer carbs? Try using coconut sugar and a dairy-free white chocolate to cut down on added sugar too.
Conclusion: Why White Chocolate Raspberry Lava Cake Belongs in Your Recipe Repertoire
White chocolate raspberry lava cake isn’t just another dessert—it’s a showstopper. From the molten, creamy white chocolate center to the burst of tangy raspberries, every bite is rich, balanced, and unforgettable. It’s a stunning treat for special occasions, yet simple enough to make on a weeknight. With endless options for gluten-free and dairy-free versions, it’s a dessert that can please nearly every palate.
Whether you’re baking for a romantic dinner, hosting friends, or treating yourself, this lava cake hits all the right notes.